Overview
Our latest release empowers you to print specific vinSUITE Products to different printers on a given sales order. With Printer Routing, you can assign printers within your winery to user-definable Print Groups, such as Kitchen, Bar, or Pizza Oven. This feature expands the printer setup options to include Print Groups alongside the default receipt printer setup in the TabletPOS App.
Hardware Compatibility
We have added support for an Epson impact printer along with our existing printing options:
- Epson TM-U220 (Kitchen Impact Receipt Printer)
- Star TSP Receipt printer
- Apple Air Print compatible printers (already built into the TabletPOS app)
Define Print Groups (Network Printers)
You can now easily define Print Groups through the vinSUITE Admin Panel in your MPOS Master Settings. This intuitive process allows you to create and manage Print Groups efficiently. To set up Print Groups, follow these simple steps:
- Log in to the Admin Panel.
- Navigate to Settings in the upper left.
- Go to System Settings, then the Mobile POS Tab.
- Go to the Define Print Groups section

In this section, you can create user-definable text fields (up to 30 characters), edit, delete Print Group entries, and much more. If no Print Groups are defined, all items will print to the Default Receipt Printer for that location, ensuring a seamless experience for your team.
Assign Print Groups to Products
To make the Printer Routing feature work for you, we've integrated Print Groups into your product properties. This way, you can specify which Print Group should be associated with each product. Here's how to do it:
- Select the Products menu on the left side of the Admin Panel.
- Click Edit on a product.
- Under the Wine tab (for First Party Wines), or the General tab (for First Party Products and Kits), go to the Printer Group drop-down list. This drop-down field will contain all defined Print Groups from your MPOS Master Settings.

The default value is "Default," which means that the item will be printed at the default receipt printer for the device if left empty.
How to use Print Routing within the TabletPOS app
Configuring Print Groups in TabletPOS App Settings
Your team can now configure Print Groups directly on the iPad. To achieve this, follow these simple steps:
- Log in to the TabletPOS on an iPad.
- Click on the Cashier Name and select Printer Groups.
- In the Printer Group modal, select the printer type you would like to assign to a print group
- Discover the printer on your network, and select the IP address that matches your printer
- Set the print group, and hit Save
Save and Fire workflow
With this new Print Routing feature, the standard order processing workflow has been slightly modified when it comes to saving orders and recalling orders. You now have the option to add a first name, last name, and table number to the order when you save the order, and determine which items from the order need to be fired to their respective printers.- Add products to the order as your normally would and proceed to the order summary screen
- Product configured to a print group, will have a red number indicating how many are available to fire to their respective printer:
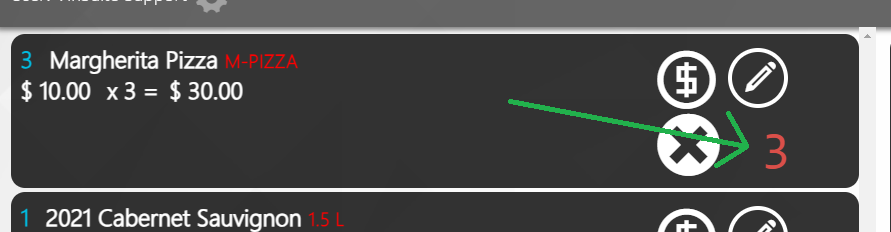
- You will need to tap on the red number to set the number of items to fire:

- Close the fire menu and tap Save & Fire:
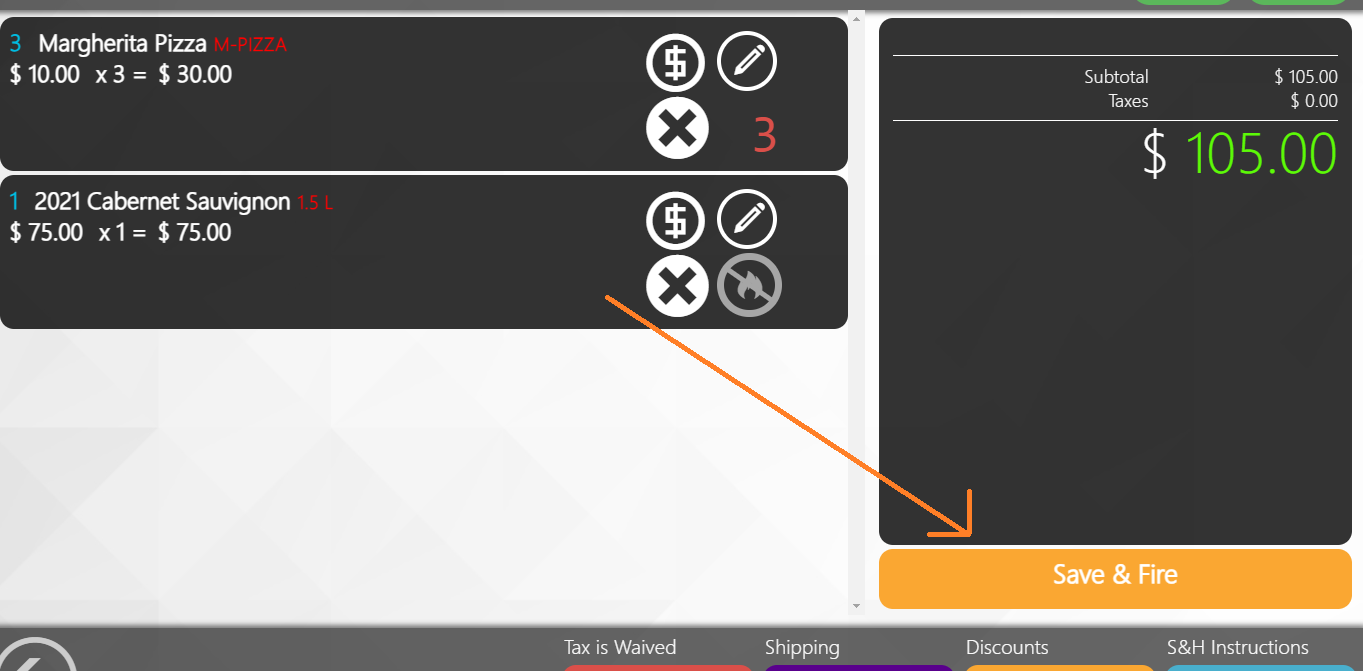
- Enter the name of the guest and table number and tap Save & Fire. NOTE: This action saves the order and fires the print job based on your previous product and print group setup

Manager Override to clear fired status
We understand that there may be situations where a Fired item needs to have its fired status reset, so it can be fired again. As this is a critical change that can lead to food waste, resetting the fired status of an item will always prompt a manager override. To update your permission to allow you to clear this status, please follow these quick steps in the vinSUITE admin panel.
- Go to Settings > User Management > Sales Associate tab
- Edit the desired record, and toggle on the 'Can Perform Manager Override?' permission
- Save your changes
You should now be all set to begin using the Print Routing feature and we hope this feature will save your team valuable time. If you have any feedback or need any assistance with this feature, please reach out and let us know at support@vinsuite.com.